Day 111: Recipe 25
I totally love A Year of CrockPotting. Will does too, I think.
This recipe isn't one of the "dump a bunch of cans into the crockpot" ones, so I did prep work the night before, chopping veggies so that I could just dump the baggies of stuff into the crockpot. It helped. Also, the original recipe called for red bell pepper, which we almost always have, but for some reason were out of today. So we went without, but it would have been nice to have.
I couldn't get an appetizing picture of this one, but rest assured, it tasted yummy!
Crockpot Chow Mein from A Year of CrockPotting
serves 5-6
1.5 lbs of stir fry pork
2 cups of water
2 chopped yellow onions
1 bunch of chopped celery
1/4 cup cornstarch
1/4 cup soy sauce
3 Tbsp molasses
1 can baby corn
1 can bamboo shoots
2 cup bean sprouts
spaghetti or chow mein noodles
Dump the meat, the onion, the celery, and the water in the crockpot.
Cook on low for 6-7, or on high for 4. Shred the meat, or at least make sure the pieces are separated for each other.
Mix the cornstarch, soy sauce, and molasses. A fork or whisk is best, because the cornstarch really likes to clump. Don't taste it, because on its own it doesn't taste that good (but it will later, I promise!)
Open up the cans of bamboo shoots and corn, drain the liquid, and dump it in the crockpot, along with the bean sprouts. Then go ahead and stir in the sauce mixture.
Cover the crockpot and cook on high for another hour.
Cook the pasta according to the package instructions.
Serve.
Eat.
Survey says...
I had a friend over, and she started to get excited when she entered the apartment and it was still cooking, which I figured was a good sign. Both she and Will liked it, and I did too, so this one's a keeper. Want to try with additional veggies, though!
Wednesday, April 22, 2009
Sunday, April 19, 2009
Breakfast!
Day 109: Recipe 24
Today I cooked 2 meals! Does it count if they're both breakfast? Sometimes I get lazy and cook breakfast for dinner.
I have been making this recipe for approximately 17 years. That makes me feel old.
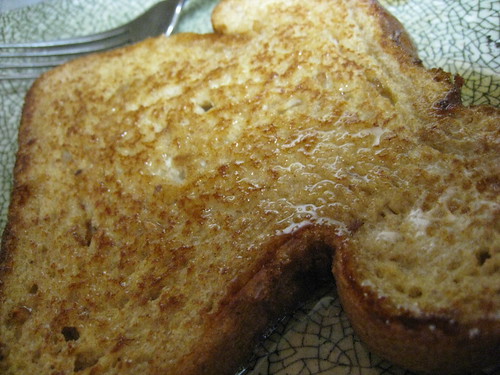
French Toast
makes 3-4 pieces
1 egg
1/2 cup of milk
1/2 tsp vanilla
dash of cinnamon
bread (stale bread is better for this recipe)
butter
Warm up a pan over medium heat. Mix up the egg, milk, vanilla, and cinnamon in a bowl.
Melt a bit of butter in the pan. Quickly dip the bread in the bowl, both sides, and put in the pan.
Let it cook for a minute or two, then flip it and cook the other side.
Repeat.
Eat!
Survey says...
When I was single, I ate this standing, while cooking, so that it would still be hot. I made Will eat it that way tonight, and I think he thought it was ridiculous, but whatever, I thought it was good.
My hand slipped and I added a little too much vanilla today, so aside from having to eat standing up, 'less vanilla' was Will's only real feedback.
Yummm, breakfast for dinner!
Today I cooked 2 meals! Does it count if they're both breakfast? Sometimes I get lazy and cook breakfast for dinner.
I have been making this recipe for approximately 17 years. That makes me feel old.
French Toast
makes 3-4 pieces
1 egg
1/2 cup of milk
1/2 tsp vanilla
dash of cinnamon
bread (stale bread is better for this recipe)
butter
Warm up a pan over medium heat. Mix up the egg, milk, vanilla, and cinnamon in a bowl.
Melt a bit of butter in the pan. Quickly dip the bread in the bowl, both sides, and put in the pan.
Let it cook for a minute or two, then flip it and cook the other side.
Repeat.
Eat!
Survey says...
When I was single, I ate this standing, while cooking, so that it would still be hot. I made Will eat it that way tonight, and I think he thought it was ridiculous, but whatever, I thought it was good.
My hand slipped and I added a little too much vanilla today, so aside from having to eat standing up, 'less vanilla' was Will's only real feedback.
Yummm, breakfast for dinner!
Friday, April 17, 2009
Homemade Pizza!
Day 107: Recipes 22 and 23
I have like a zillion blogs on my google reader (correction: I just checked, and it's only 102) on all sorts of topics, including celebrity gossip, home organization, finance, Mormon feminism, and (of course) cooking. This recipe didn't come from one of my cooking blogs - it actually came from one of the finance ones!
Homemade pizza sounded like, fun, so we decided to give it a shot! I'm counting it as two recipes, because one is the dough, and the other is the pizza we came up with. (Give me a break - I have less than a quarter of the recipes I'm supposed to at this point!)

Pizza Dough (modified from The Simple Dollar)
2 cups whole wheat flour
1 cup white flour
1 cup water
2 tablespoons olive oil
1 teaspoon dry yeast
1 teaspoon salt
Italian seasoning
oregano
Warm up the water, (you should still be able to touch it - too hot and it can do bad things to the yeast) then toss everything into a bowl and mix it up. I do it with our stand mixer. (OMG, I love our stand mixer!)
After it's pretty mixed, knead it with your hands. Then cover it with a towel, and leave it in a warm spot to rise for about an hour.
After an hour, knead it again, and then stretch it out on a pan. (We use a cookie sheet, because our pizza stone is in Texas.) Sometimes I let it rise for a bit again.
Then - and this is the important part - pre-bake the dough. Stick in a pre-heated oven for about 6 minutes. Pop any bubbles that come up.
Now we do the rest of the pizza part.
Sausage, Mushroom, Onion, and Red Bell Pepper Pizza
(serves 4-5)
pizza dough (store bought, or see above)
olive oil
pizza sauce
sausage
mushrooms
onion
red bell peppers
mozzarella cheese
oregano
Put a little bit of olive oil in a pan, and then lightly saute the sausage, mushrooms, onions and red bell peppers.
You have your pre-baked pizza dough, right? Spread the pizza sauce on top.
Now... layer. We put a bit of cheese, a bit of toppings, a bit more cheese, and then more toppings. Sprinkle the oregano on top. You can do it in whichever order you want.
Bake in a preheated oven of 400 degrees for about 15-20 minutes.
Eat. (Though I recommend letting it cool first.)
Survey says...
I try to make things healthier with whole wheat, but I don't think it worked so well in this recipe. We're going to play around with the dough some.
But the rest of the pizza was good. We're going to try to make this a weekly thing!
I have like a zillion blogs on my google reader (correction: I just checked, and it's only 102) on all sorts of topics, including celebrity gossip, home organization, finance, Mormon feminism, and (of course) cooking. This recipe didn't come from one of my cooking blogs - it actually came from one of the finance ones!
Homemade pizza sounded like, fun, so we decided to give it a shot! I'm counting it as two recipes, because one is the dough, and the other is the pizza we came up with. (Give me a break - I have less than a quarter of the recipes I'm supposed to at this point!)
Pizza Dough (modified from The Simple Dollar)
2 cups whole wheat flour
1 cup white flour
1 cup water
2 tablespoons olive oil
1 teaspoon dry yeast
1 teaspoon salt
Italian seasoning
oregano
Warm up the water, (you should still be able to touch it - too hot and it can do bad things to the yeast) then toss everything into a bowl and mix it up. I do it with our stand mixer. (OMG, I love our stand mixer!)
After it's pretty mixed, knead it with your hands. Then cover it with a towel, and leave it in a warm spot to rise for about an hour.
After an hour, knead it again, and then stretch it out on a pan. (We use a cookie sheet, because our pizza stone is in Texas.) Sometimes I let it rise for a bit again.
Then - and this is the important part - pre-bake the dough. Stick in a pre-heated oven for about 6 minutes. Pop any bubbles that come up.
Now we do the rest of the pizza part.
Sausage, Mushroom, Onion, and Red Bell Pepper Pizza
(serves 4-5)
pizza dough (store bought, or see above)
olive oil
pizza sauce
sausage
mushrooms
onion
red bell peppers
mozzarella cheese
oregano
Put a little bit of olive oil in a pan, and then lightly saute the sausage, mushrooms, onions and red bell peppers.
You have your pre-baked pizza dough, right? Spread the pizza sauce on top.
Now... layer. We put a bit of cheese, a bit of toppings, a bit more cheese, and then more toppings. Sprinkle the oregano on top. You can do it in whichever order you want.
Bake in a preheated oven of 400 degrees for about 15-20 minutes.
Eat. (Though I recommend letting it cool first.)
Survey says...
I try to make things healthier with whole wheat, but I don't think it worked so well in this recipe. We're going to play around with the dough some.
But the rest of the pizza was good. We're going to try to make this a weekly thing!
Thursday, April 16, 2009
Muffins!
Day 106: Recipe 22
Breakfast and I don't do so well. I don't like waking up early, and my tummy is usually grumbly first thing in the morning. So I usually go without which apparently is, like, bad for you and stuff. So I'm trying to make grab and go breakfasts, and my first attempt is this recipe, which I found by randomly googling.
When I was growing up, my dad was always telling me to eat roughage, and trying to get me to eat Fiber One, I thought it was gross, and would have much rather just had something chocolate for breakfast.
This way I get both!

Fiber One Chocolate Chip Muffins (from Sparkpeople)
makes about 20
1 cup Fiber One cereal
1 cup whole wheat flour
2/3 cup brown sugar
1 tsp baking powder
1 tsp baking soda
1/2 tsp salt
1 cup chocolate chips
1 cgg
1/2 tsp vanilla extract
1/4 cup olive oil
1 cup milk
In one bowl, mix up all the dry stuff, including the chocolate chips. In another, mix up all the wet stuff.
Add the wet stuff to the dry stuff and mix it up.
Line muffin tins with paper cups, or oil them, and then put the mix into the cups.
Bake in a 375 degree oven for 15-20 minutes.
Chow down.
Survey says...
Well, they're made with fiber one, so they're not the yummiest thing in the world, but they're filling and the chocolate helps.
Okay, I have a really stupid question - are you supposed to crush the cereal? Because we didn't, but I'm thinking we were supposed to. But then that would have mean we needed more cereal. So I dunno.
Will doesn't like chocolate chips (crazy, right?) so I made some without the chips for him, and he thought they were bland. But, I mean, that's what happens when you leave out the crucial chocolate part!
Might mess around with these muffins some.
Breakfast and I don't do so well. I don't like waking up early, and my tummy is usually grumbly first thing in the morning. So I usually go without which apparently is, like, bad for you and stuff. So I'm trying to make grab and go breakfasts, and my first attempt is this recipe, which I found by randomly googling.
When I was growing up, my dad was always telling me to eat roughage, and trying to get me to eat Fiber One, I thought it was gross, and would have much rather just had something chocolate for breakfast.
This way I get both!
Fiber One Chocolate Chip Muffins (from Sparkpeople)
makes about 20
1 cup Fiber One cereal
1 cup whole wheat flour
2/3 cup brown sugar
1 tsp baking powder
1 tsp baking soda
1/2 tsp salt
1 cup chocolate chips
1 cgg
1/2 tsp vanilla extract
1/4 cup olive oil
1 cup milk
In one bowl, mix up all the dry stuff, including the chocolate chips. In another, mix up all the wet stuff.
Add the wet stuff to the dry stuff and mix it up.
Line muffin tins with paper cups, or oil them, and then put the mix into the cups.
Bake in a 375 degree oven for 15-20 minutes.
Chow down.
Survey says...
Well, they're made with fiber one, so they're not the yummiest thing in the world, but they're filling and the chocolate helps.
Okay, I have a really stupid question - are you supposed to crush the cereal? Because we didn't, but I'm thinking we were supposed to. But then that would have mean we needed more cereal. So I dunno.
Will doesn't like chocolate chips (crazy, right?) so I made some without the chips for him, and he thought they were bland. But, I mean, that's what happens when you leave out the crucial chocolate part!
Might mess around with these muffins some.
Tuesday, April 14, 2009
Help! My Apartment Has a Kitchen!
Day 104: Recipe 21
The title of this post is the name of the book I got this from, not what I said when I moved in.
This is a recipe I've tried before, but I can't ever find ground pork, so I make it with ground chicken instead. Why can I find ground lamb and ground buffalo, but not ground pork?
Whateves. It's still good.
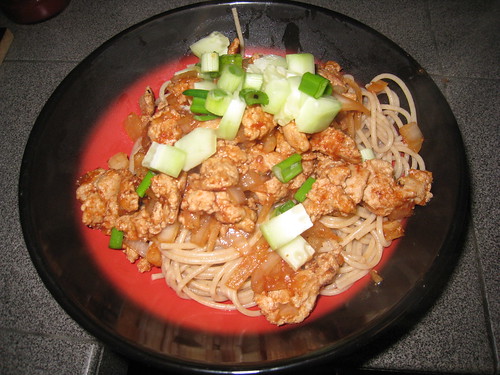
Sizzling Chicken Noodles (from Help! My Apartment Has a Kitchen!)
serves 2-3
1 medium onion
2 garlic cloves
1 pound ground chicken
1/2 cup chili sauce
1/4 cup water
3 tbsp soy sauce
1 tbsp vinegar
1/4 tsp black pepper
12 oz vermicelli
1/2 large cucumber
2 scallions
Set the water to boil - you'll be using this for the pasta.
Peel and finely chop the garlic and onion.
Brown the chicken in a frying pan over medium heat, and then drain the fat. Add the onion, garlic, chili sauce, water, soy sauce, vinegar, and black pepper, stirring it all up. Over medium heat cook it uncovered for about 8 minutes, until most of the liquid has evaporated.
While the sauce is cooking, add the vermicelli to the water and cook it.
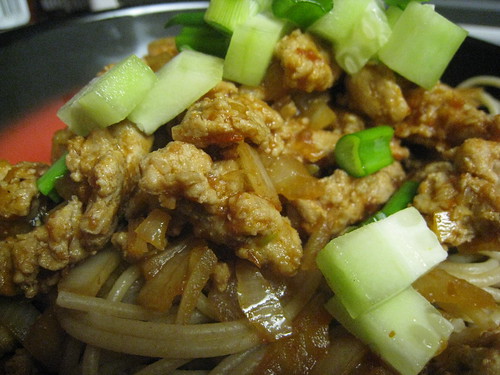
While the vermicelli is cooking, wash and chop up the cucumber and scallions. If I'm feeling lazy I don't peel the cucumber, but it changes the texture some, so if you want, you can. With the scallions, you mainly want the green parts.
When the noodles are done, plate them, and top with the sauce. Then sprinkles the cucumber and scallion pieces and serve.
Survey says...
I've made these a handful of times, and we both really like it. I need to figure out what's the deal with no ground pork in my life, but in the mean time, it's great with chicken!
The title of this post is the name of the book I got this from, not what I said when I moved in.
This is a recipe I've tried before, but I can't ever find ground pork, so I make it with ground chicken instead. Why can I find ground lamb and ground buffalo, but not ground pork?
Whateves. It's still good.
Sizzling Chicken Noodles (from Help! My Apartment Has a Kitchen!)
serves 2-3
1 medium onion
2 garlic cloves
1 pound ground chicken
1/2 cup chili sauce
1/4 cup water
3 tbsp soy sauce
1 tbsp vinegar
1/4 tsp black pepper
12 oz vermicelli
1/2 large cucumber
2 scallions
Set the water to boil - you'll be using this for the pasta.
Peel and finely chop the garlic and onion.
Brown the chicken in a frying pan over medium heat, and then drain the fat. Add the onion, garlic, chili sauce, water, soy sauce, vinegar, and black pepper, stirring it all up. Over medium heat cook it uncovered for about 8 minutes, until most of the liquid has evaporated.
While the sauce is cooking, add the vermicelli to the water and cook it.
While the vermicelli is cooking, wash and chop up the cucumber and scallions. If I'm feeling lazy I don't peel the cucumber, but it changes the texture some, so if you want, you can. With the scallions, you mainly want the green parts.
When the noodles are done, plate them, and top with the sauce. Then sprinkles the cucumber and scallion pieces and serve.
Survey says...
I've made these a handful of times, and we both really like it. I need to figure out what's the deal with no ground pork in my life, but in the mean time, it's great with chicken!
Sunday, April 12, 2009
Easter Brunch!
I have been cooking more than I've been posting! Over the next few days I'll be posting stuff that I've cooked over the past month (let's not kid ourselves, it's only 7 recipes). I'm also going to start participating in Menu Plan Mondays because it'll help my whole "planning and then actually cooking" thing.
Oh, and I have already started figuring out the 10 course meals I'm going to have to cook over the summer to catch myself up.
Anyways, on to the recipe...
Day 102: Recipe 20
I've linked to Kayotic a few times, because I'm (a) in love with her recipes, and (b) in love with her pictures. This is one of her newest recipes, and it looked amazing and perfect for Easter, so I figured I'd give it a shot!
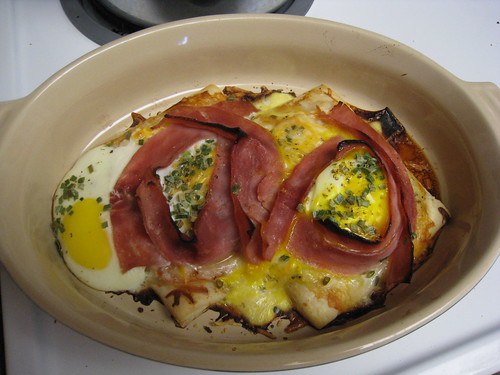
Egg Pie (from Kayotic)
serves 2
2 puff pastry sheet
3 slices ham
1 small tomato
2 egg
cheese
chives
pepper
salt
Preheat your oven to 400.
Get a baking dish that is the appropriate size for however many you're planning on making - we made two, and put the pastry puffs down. Thinly slice a tomato and lay the slices on the pastry puff - the thicker the slices, the soggier the puff will get, so keep them thin.
Then put the cheese on top - we had a few different kinds, so we put some Parmesan, mozzarella, and cheddar. Sprinkle some salt, pepper, and chives on the cheese. We actually didn't put any salt, and I didn't miss it at all (though I'm usually a salt-lover).
Thin ham would work best for this, but we went with what was cheapest, so we cut it into strips and made two "wells" to keep the egg from running everywhere. As you can tell from the pictures, we didn't do that good a job at the wells, one slipped right out, which doesn't affect the taste, but makes it less pretty.
Will's not a fan of runny yolk, so we popped his, but we kept mine while. Sprinkle more salt, pepper, and chives on top of that, and then stick it in the oven.
To minimize runnyness, we cooked ours for around 27 minutes - it was a little overcooked for my tastes, but Will thought it was good. Ahh, the sacrifices we make for marriage. 20-25 minutes would probably have been just about right for me, but it still worked at 27.
Chow down!

Survey says...
We loved it! Next time Will would want his completely scrambled, not just yolk popped, but aside from that, it was just about right. I might also try it with thin ham, or maybe bacon! Bacon might be too strong a taste, but I think I'm okay with that, if it means we get bacon!
Totally making this again, and it was an easy but very fancy-looking dish.
Oh, and I have already started figuring out the 10 course meals I'm going to have to cook over the summer to catch myself up.
Anyways, on to the recipe...
Day 102: Recipe 20
I've linked to Kayotic a few times, because I'm (a) in love with her recipes, and (b) in love with her pictures. This is one of her newest recipes, and it looked amazing and perfect for Easter, so I figured I'd give it a shot!
Egg Pie (from Kayotic)
serves 2
2 puff pastry sheet
3 slices ham
1 small tomato
2 egg
cheese
chives
pepper
salt
Preheat your oven to 400.
Get a baking dish that is the appropriate size for however many you're planning on making - we made two, and put the pastry puffs down. Thinly slice a tomato and lay the slices on the pastry puff - the thicker the slices, the soggier the puff will get, so keep them thin.
Then put the cheese on top - we had a few different kinds, so we put some Parmesan, mozzarella, and cheddar. Sprinkle some salt, pepper, and chives on the cheese. We actually didn't put any salt, and I didn't miss it at all (though I'm usually a salt-lover).
Thin ham would work best for this, but we went with what was cheapest, so we cut it into strips and made two "wells" to keep the egg from running everywhere. As you can tell from the pictures, we didn't do that good a job at the wells, one slipped right out, which doesn't affect the taste, but makes it less pretty.
Will's not a fan of runny yolk, so we popped his, but we kept mine while. Sprinkle more salt, pepper, and chives on top of that, and then stick it in the oven.
To minimize runnyness, we cooked ours for around 27 minutes - it was a little overcooked for my tastes, but Will thought it was good. Ahh, the sacrifices we make for marriage. 20-25 minutes would probably have been just about right for me, but it still worked at 27.
Chow down!
Survey says...
We loved it! Next time Will would want his completely scrambled, not just yolk popped, but aside from that, it was just about right. I might also try it with thin ham, or maybe bacon! Bacon might be too strong a taste, but I think I'm okay with that, if it means we get bacon!
Totally making this again, and it was an easy but very fancy-looking dish.
Wednesday, March 11, 2009
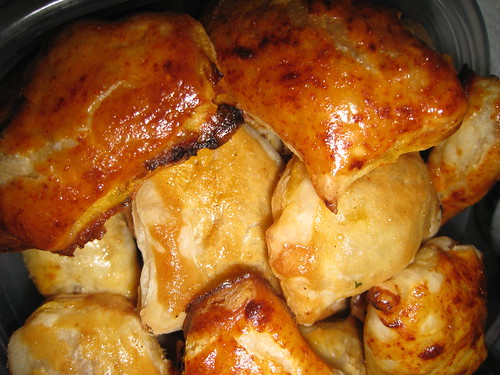
Generic Asian Chicken
Day 70: Recipe 19
The 'generic' in the title should not be interpreted to mean that it tastes bland - just that I can't place the region of Asia that this particular taste comes from. It's a good taste, though.
I've actually made this recipe before, but I used breast meat, and while we thought it was good, we thought it was really garlicy (yes, even I thought something was too garlicy) so I used thigh meat (as suggested) and modified the recipe a bit this time around. Good call!
Asian Chicken (modified from A Year of Crockpotting)
makes 6 chicken thighs
6 chicken thighs (I used boneless)
1 1/2 Tbl soy sauce
1 1/2 Tbl fish sauce
1 1/2 tsp white sugar
1/2 tsp black pepper
3 cloves chopped garlic
1/4 tbs fresh minced ginger
1 Tbl canola oil
Put the thighs in the crockpot.
Dump everything else in a bowl and mix it well, then pour it over the chicken.
Cook it on low for about 6 hours, or on high for about 3-4.
Eat!
Survey Says
Will kept on repeating how much he liked it and how it was totally better than last time, so it's safe to say that he's a fan. I really enjoyed it too, but again, I could have used a bit stronger taste. Maybe I have a cold or something that's affecting my sense of taste?
Definitely making it again, though.
Tuesday, March 10, 2009
Veggie Taco Chili Soup Thing
Day 69: Recipe 18
I should probably stop making crock pot recipes and save them for a week that I really need them, but this is mainly just to get me back into the swing of cooking - next week I'll actually cook some stuff.
The official name of this recipe is "Taco Soup" but it's really more of a chili than a soup. At least mine did. Still good, though!
Taco Chili/Soup (from A Year of Crockpotting)
makes 3-4 quarts
2 cans of kidney beans
2 cans of pinto beans
2 cans of corn
1 can of diced tomatoes
1 can of tomatoes and chilies
1 packet of taco seasoning
1 packet of ranch dressing mix
shredded cheese and sour cream
optional:
1 lb browned ground meat (turkey or beef)
This recipe is an example of why I love the crockpot.
Drain and rinse the beans, then dump them in the crockpot.
Dump both cans of corn and both cans of tomatoes into the crockpot - the whole can, including the juices.
Dump the to packets of seasoning into the crockpot.
Dump the meat into the crockpot (if you're using it).
Stir.
Cook on low for 8-10 hours, or high for 4-5.
Serve, add cheese and sour cream to taste, and eat.
I told you it was easy!
Survey says...
It was good. However, I'm starting to think that I may have lost a few tastebuds, because I think it probably could have used another packet of taco seasoning. We went meatless because the turkey wasn't defrosted before I left for work, and I didn't feel like messing with defrosting it and then browning it, but Will still ate it, which is a pretty big deal because he's a meat and potatoes kind of guy. (Oh, and two years ago he wouldn't touch beans with a 10 foot poll!)
Will ate his whole bowl, seconds, and half of my seconds (because I got full). And took it in for lunch today. So my guess is that he liked it too.
Monday, March 9, 2009
Manouche Zatar
Day 68: Recipe 17
This is probably stretching whether or not it counts as a recipe, but I'm behind, so we're going to count it anyways.
Okay, so tonight I was craving something snacky, and over the weekend I'd wandered into a World Market and come across zatar spice mix and decided to buy it on a whim. I wasn't sure how, but I wanted to figure out how to throw together some manouche zatar, which is a bread thingie I grew up with.
We have some frozen Rhodes bread rolls because I discovered over Christmas that my husband is totally in love with them, so I decided to throw the two together and make me some manouche!
It should be noted that these are a lot smaller than they look in the picture - they're about 3-4 inches across.

Manouche Zatar
frozen Rhodes bread roll
zatar spice mix
olive oil
Let the bread roll rise. This is the most frustrating part, because it takes the most time. There has to be an easier way to do this.
Roll out the roll into a little circle once it's defrosted and risen.
Mix the spice mix and the olive oil together, and then drizzle it on the bread.
Bake at 350 for about 15 minutes (but watch it, in case it overcooks).
Eat!
Survey Says
It tasted really good, but there has to be a better way of doing the dough. This was a spur of the moment decision, though, so I didn't really research it.
Will liked it too. Mine was heavy on the zatar, and I thought it was perfect, his was light on the zatar, and he thought his was perfect.
I'm so glad I thought of the rolls and figured out how to do it!
This is probably stretching whether or not it counts as a recipe, but I'm behind, so we're going to count it anyways.
Okay, so tonight I was craving something snacky, and over the weekend I'd wandered into a World Market and come across zatar spice mix and decided to buy it on a whim. I wasn't sure how, but I wanted to figure out how to throw together some manouche zatar, which is a bread thingie I grew up with.
We have some frozen Rhodes bread rolls because I discovered over Christmas that my husband is totally in love with them, so I decided to throw the two together and make me some manouche!
It should be noted that these are a lot smaller than they look in the picture - they're about 3-4 inches across.
Manouche Zatar
frozen Rhodes bread roll
zatar spice mix
olive oil
Let the bread roll rise. This is the most frustrating part, because it takes the most time. There has to be an easier way to do this.
Roll out the roll into a little circle once it's defrosted and risen.
Mix the spice mix and the olive oil together, and then drizzle it on the bread.
Bake at 350 for about 15 minutes (but watch it, in case it overcooks).
Eat!
Survey Says
It tasted really good, but there has to be a better way of doing the dough. This was a spur of the moment decision, though, so I didn't really research it.
Will liked it too. Mine was heavy on the zatar, and I thought it was perfect, his was light on the zatar, and he thought his was perfect.
I'm so glad I thought of the rolls and figured out how to do it!
Cream Cheese Chicken
Day 68: Recipe 16
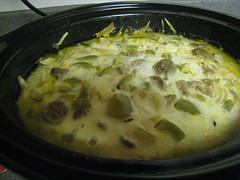
Just to let you know, there is no way to make this food look appetizing in a picture. It's very pale and looks kind of like mush. That is why there's no picture.
That should not, however, be taken to mean that it doesn't actually taste appetizing.
I was really skeptical about this recipe when I saw it for the first time because I couldn't really tell how all the flavors worked together. But I kept reading everywhere and it appears it's the classic easy crock pot recipe that everyone loves, so I figured I had to try it.
Cream Cheese Chicken from A Year of Crockpotting
makes enough for 2-3 adults
2 cups homemade cream of mushroom soup*
3 frozen chicken breasts
1 packet of dry Italian salad dressing mix
2 cloves of minced garlic
block of cream cheese (to add later)
*if you don't have homemade soup, you can just get a can of it, and then 2 cups of chicken broth
Put the chicken in the crock pot.
Dump the mix, garlic, and soup on top.
Cook for 6 hours on low.
(I love the crock pot)
Shred the chicken with a fork, and dump in the cream cheese.
Cook for another 30 minutes on high.
Serve over rice or pasta.
Survey Says
I liked, it but I thought that it needed more flavoring. Maybe two dressing packets next time?
Will thought it was good, but that it lacked texture. I'm going to try it again with more flavoring (maybe use the flavorings that are included in the "homemade" version of the recipe I linked?), and a pasta that has some texture (like farfale or rotini).
Sunday, March 8, 2009
Stuff to freeze!
Day 67: Recipe 15
In my continued attempt to cook regularly, I scoured through my bookmarked items to try to find the next recipe, and decided to try Chicken Puff Samosas because
(a) I've never cooked anything like this before, and
(b) The pictures on this blog are so amazing that I'd gone way too long already without trying one of her recipes
Seriously, poke through her food blog. The pictures make my mouth water just from looking at them.
Actually, I'm going to go grab a samosa from the freezer before I finish writing this, because the pictures are making me hungry.
Chicken Puff Samosas modified from here
makes about 24
6 puff pastry sheets
1 chicken fillet (about 5 oz)
2 tsp tomato paste
1 tbsp sour cream
1/2 bell pepper
1/2 chili pepper
1/2 onion
1 T oil
honey
parsley
curry powder
paprika powder
pepper
salt
egg
If you got frozen puff pastry, pull it out so it has a chance to defrost.
Mince up the bell pepper, onion, and chili. You can peel it if you want, but I didn't, and didn't really find any issues with the texture.
Cut up the chicken, and then sprinkle some salt, pepper, and curry powder, and then mix it all up. Make sure everything's well coated I under-seasoned and then ended up adding a lot more later, so go generously - especially with the curry. But if you're sensitive to spice and taste, know that you can add later.
Heat up the oil and toss the chicken in, cooking it until it's really well done. Then dump the chicken into a bowl, but don't clean out the pan, and toss in the veggies (add more oil if you need it).
Cook the veggies over medium until the onions translucent, and then add in the tomato paste and sour cream. The original recipe had pineapple & pineapple juice, but I'm not a fan of pineapple, so I did a squeeze of honey to substitute the sweetness, without having to do the pineapple taste. Mix it all up, and then let it simmer over low heat while you tend to the chicken.
Get the chicken shredded, whether that's by hand, with two forks, or just chopping it up into little bits. Toss it into the veggies, and taste to see if you need to add anything again.
Taste a second time, because it's really good.
Taste a third them, and then tell yourself that you need to stop, or else you won't have anything left to fill the puffs.
Grab a small bunch of flat leaf parsley and chop it up. Then stir it into the chicken veggie mixture.
This must be the longest recipe I've typed up yet.
Sprinkle a cutting board with flour and put the pastry sheet down, and then sprinkle it again. This was my first time dealing with this kind of dough, so know that it's fragile and can be sticky. Roll it out so that it's flatter, and then cut each piece into quarters. Put some of the filling on it and then fold it over to pinch it up. The original recipe said to fold it on the diagonal to make triangles, but I much preferred the fold-in-half-to-make-rectangles ones because there was a more even meat-to-puff ratio.
Plop them on the cookie sheet. (Delicately, so they don't fall apart!) They're not going to expand by much, so you can put them relatively close together.
Okay, so this next part is optional, but fun. To add a little color to the outside, you can crack an egg, and brush it on it. To add a little taste to the outside, sprinkle paprika on the now-wet dough. Or, if you're completely uncoordinated like I am, mix up the egg and the paprika, and then brush the mixture over the dough.
Get your oven to 400 degrees, then put them in there. Leave them there for 12 to 15 minutes, and then take them out.
Eat.
Survey Says
They were GOOD. My husband said that they're "probably some of the best samosas [he's] ever had," but I suspect he's exaggerating a bit because he doesn't want to do the dishes. I think I want to try them with a non-pufflike dough, or maybe I just need to perfect working with the dough.
We froze them after cooking because I want more non-microwave-dinner stuff in our fridge. While writing this I ate 3 that I'd defrosted and they were great.
I want to try figuring out how to make veggie ones, but in the mean time I'm going to love eating the ones we have!
I love cooking.
Saturday, March 7, 2009
Cream of Mushroom Soup
Day 66: Recipe 14
Friday night after the fun scallop experiment I went through and made a menu plan for the week, because I've decided that I need to stop making excuses for not cooking, and just do it. It helps my mood so much, so I just need to get it done.
One of the things that I've found is that there are a handful of "quick and easy"-type recipes that require cream of something soup - most often, cream of mushroom. So when I was looking through recipes I've bookmarked from A Year of Crockpotting I decided that a good place to start would be to make my own cream of mushroom soup!
My husband was less than thrilled with this proposal, since he's not a fan of mushrooms, but he was a good sport and let 2 pounds worth of mushrooms cook in the apartment all day anyways. The recipe is modified because we only have a 4 qt crockpot, and she suggested a 5 qt for the proportions she mentioned (though now I think I could have done her proportions with my size anyways).
Cream of Mushroom Soup from A Year of Crockpotting
1.5 lbs mushrooms
1 cup water
4 cups vegetable broth
juice of 1 lemon
1/2 tsp salt
1/2 tsp pepper
3/4 tbsp dried minced onion
1 1/2 tbsp Italian seasoning
3 cups milk (added later)
Wash and cut up your mushrooms. Dump in the crockpot. Add the spices. Add the lemon juice. Add the vegetable broth and water.
Cook for 8 hours.
With an immersion hand blender, blend it all up. It will look kinda grainy, but it doesn't taste that way - just make sure all the big chunks are blended.
Stir in the milk. The only thing we had in the house was lactose-free milk, which tends to be a little on the sweet side, but it was fine.
Let it cool on the counter for a few hours. We watched The Wrath of Khan to kill the time.
Stir it to mix up anything that may have settled, and then pour it into whatever storage device you're using. We used sandwich-sized freezer bags. Freeze them flat, then you can store them wherever you have room once they're solid.
Survey Says
It was good! Even Will said that "it was okay." He's also said that he's "willing to try more of it." For someone who hates mushrooms, I'd say it was a ringing endorsement.
I used the same amount of pepper as was used in the original recipe, and there was a bit of a kick to it, so if you're really sensitive to spice, I'd tone it down a bit (or use more mushrooms). Also, it didn't have the thickness that I'm used to with regular cream of something soups - it was pretty thin, but I didn't mind that.
Definitely using it in recipes, and just eating it all alone.
Friday, March 6, 2009
I can cook scallops!
Day 65: Recipe 13
My goal is to be at 45 recipes by the end of March, so that at least I'm halfway caught up.
So I love scallops whenever I eat them in restaurants, but I've been really anxious about making them myself because they're expensive and everyone says they're really complex. However, last night during my grocery store visit I decided, what the heck?
So I went to the seafood counter and asked for 2 scallops. "Only two?" the guy asked. "Only two," I confirmed. "I've never cooked them before, so I'm just experimenting." "Makes sense," he said, and wrapped them up for me. "Two scallops, that'll be $300."
And THAT is why I only got two. (I should probably clarify that they weren't really that much.)
I was really nervous about cooking them. If my boss didn't read this, I might admit that I spent about an hour this afternoon watching videos about how to cook them online. But since she (and her mom) do, I won't tell you that.
There's this dish from one of my favorite LiveJournal communities ever, Food Porn, that I've been wanting to try for a while, so I figured I'd try to throw that together, even though there's not a real recipe, but instead just ingredients.
And it worked!
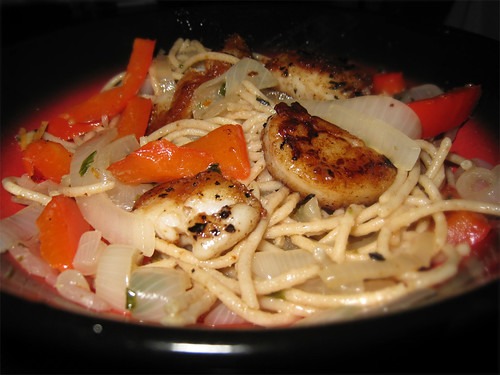
Red Pepper Scallop Pasta from here
serves 2
at least 2 scallops (though next time I'm totally using more)
14 oz of spaghetti
1 red pepper
1 onion
1 clove of garlic
oregano
basil
olive oil
salt
pepper
The night before, cut up the onion and pepper and put it in a container. Dump some olive oil, salt, and pepper in, and let it sit overnight. (Mix it or flip it over a couple of times so that all of the veggies get marinated.
The next day, cook up the pasta.
Put the veggies in a pan and saute them over medium heat in the olive oil with the garlic, oregano, and basil (and other herbs you think would work if you have them) until the onions are relatively clear. Once they're cooked, dump them and most of the olive oil into the pasta.
Put the pan over high heat and tend to the scallops. I cut them in half horizontally, so I ended up with 4 discs. Season one side with salt and pepper, and then put them, seasoned side down, into the pan. Let them cook and sprinkle the up side with more salt and pepper. Flip them when they're nicely browned - it took me about a minute and a half. After another minute and a half, you're done!
Serve up the pasta and veggies, then top with the scallops.
You can cook scallops, too!
Survey Says
Overall, we really liked it! One thing I'll change next time is that this time I cut the veggies in strips, next time I'd dice into small squares. Also, I'd use more scallops now that I know I can cook them and make them taste yummy.
My husband wanted something to balance out onions and peppers, but isn't sure what he's looking for. It might be that they needed to cook for a little longer so that they weren't as strong tasting, but we're not sure if that's it. Any suggestions?
But yes, we're definitely making it again.
My goal is to be at 45 recipes by the end of March, so that at least I'm halfway caught up.
So I love scallops whenever I eat them in restaurants, but I've been really anxious about making them myself because they're expensive and everyone says they're really complex. However, last night during my grocery store visit I decided, what the heck?
So I went to the seafood counter and asked for 2 scallops. "Only two?" the guy asked. "Only two," I confirmed. "I've never cooked them before, so I'm just experimenting." "Makes sense," he said, and wrapped them up for me. "Two scallops, that'll be $300."
And THAT is why I only got two. (I should probably clarify that they weren't really that much.)
I was really nervous about cooking them. If my boss didn't read this, I might admit that I spent about an hour this afternoon watching videos about how to cook them online. But since she (and her mom) do, I won't tell you that.
There's this dish from one of my favorite LiveJournal communities ever, Food Porn, that I've been wanting to try for a while, so I figured I'd try to throw that together, even though there's not a real recipe, but instead just ingredients.
And it worked!
Red Pepper Scallop Pasta from here
serves 2
at least 2 scallops (though next time I'm totally using more)
14 oz of spaghetti
1 red pepper
1 onion
1 clove of garlic
oregano
basil
olive oil
salt
pepper
The night before, cut up the onion and pepper and put it in a container. Dump some olive oil, salt, and pepper in, and let it sit overnight. (Mix it or flip it over a couple of times so that all of the veggies get marinated.
The next day, cook up the pasta.
Put the veggies in a pan and saute them over medium heat in the olive oil with the garlic, oregano, and basil (and other herbs you think would work if you have them) until the onions are relatively clear. Once they're cooked, dump them and most of the olive oil into the pasta.
Put the pan over high heat and tend to the scallops. I cut them in half horizontally, so I ended up with 4 discs. Season one side with salt and pepper, and then put them, seasoned side down, into the pan. Let them cook and sprinkle the up side with more salt and pepper. Flip them when they're nicely browned - it took me about a minute and a half. After another minute and a half, you're done!
Serve up the pasta and veggies, then top with the scallops.
You can cook scallops, too!
Survey Says
Overall, we really liked it! One thing I'll change next time is that this time I cut the veggies in strips, next time I'd dice into small squares. Also, I'd use more scallops now that I know I can cook them and make them taste yummy.
My husband wanted something to balance out onions and peppers, but isn't sure what he's looking for. It might be that they needed to cook for a little longer so that they weren't as strong tasting, but we're not sure if that's it. Any suggestions?
But yes, we're definitely making it again.
Thursday, March 5, 2009
Cooking totally turned my day around
Day 64: Recipe 12
I was in a major funk today, and then to top it off I had to go shopping for an ice cream social in my building today. While at the store I decided that I was going to cook, gosh darn it, because cooking makes me feel better!
Since it was already 8:30 at night I didn't want to do anything fancy, so we just threw the steaks on the grill. But I called my mom to get this salad recipe that I'm kind of in love with.
Yes, salads count.
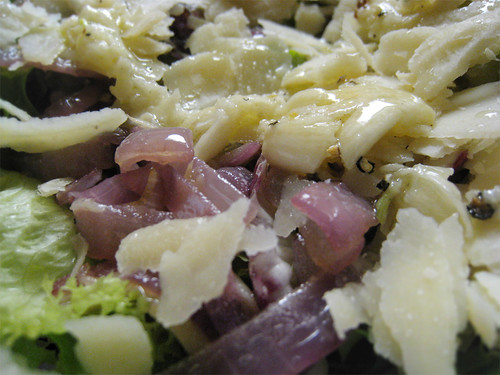
Insalata di cipolle e rucola
(Arugula and onion salad)
Serves 3-4 normal people, or just me
1 large red onion
baby arugula (spring mix works too)
thinly sliced parmigiano cheese – Reggiano is best
3-4 garlic cloves
a bit sea salt
a bit freshly grounded black pepper
juice from one lemon (use ½ the juice to start; remainder to taste)
2 tablespoons extra virgin olive oil
Pound the garlic and the salt together until it becomes kind of a creamy mixture. Add the olive oil, lemon juice, and pepper and mix it all up well.
Cut up the onion and saute it in some more olive oil until it's brown. Once the onion is done, pour half the sauce on the onions.
In a salad bowl, layer the arugula, onions, and slices of parmigiano cheese.
Dump the rest of the sauce on.
Eat.
Survey Says
Well, I made this because I love it so it's safe to say that I think it's a keeper. My husband said it was really good, but that it needs something crunchy in it - "like a walnut, or bacon". He wants me to add bacon to everything, so this may just be an excuse, but it's definitely something to consider for the future!
I was in a major funk today, and then to top it off I had to go shopping for an ice cream social in my building today. While at the store I decided that I was going to cook, gosh darn it, because cooking makes me feel better!
Since it was already 8:30 at night I didn't want to do anything fancy, so we just threw the steaks on the grill. But I called my mom to get this salad recipe that I'm kind of in love with.
Yes, salads count.
Insalata di cipolle e rucola
(Arugula and onion salad)
Serves 3-4 normal people, or just me
1 large red onion
baby arugula (spring mix works too)
thinly sliced parmigiano cheese – Reggiano is best
3-4 garlic cloves
a bit sea salt
a bit freshly grounded black pepper
juice from one lemon (use ½ the juice to start; remainder to taste)
2 tablespoons extra virgin olive oil
Pound the garlic and the salt together until it becomes kind of a creamy mixture. Add the olive oil, lemon juice, and pepper and mix it all up well.
Cut up the onion and saute it in some more olive oil until it's brown. Once the onion is done, pour half the sauce on the onions.
In a salad bowl, layer the arugula, onions, and slices of parmigiano cheese.
Dump the rest of the sauce on.
Eat.
Survey Says
Well, I made this because I love it so it's safe to say that I think it's a keeper. My husband said it was really good, but that it needs something crunchy in it - "like a walnut, or bacon". He wants me to add bacon to everything, so this may just be an excuse, but it's definitely something to consider for the future!
Wednesday, February 25, 2009
The Oscars
Day 52: Recipe 11
So one of my coworkers has this awesome Oscar party every year and asked people to bring a snacky-type food to share. Last year, when I wasn't trying to cook regularly, I brought 3 different dishes. This year, when I'm about 41 recipes behind where I should be, I only brought one.
Go figure.
It was a goodie, though!

Roasted Red Pepper Dip
makes around 1-2 cups?
3 red bell peppers
2 cloves garlic
1-2 tbsp olive oil
1-2 tbsp balsamic vinegar
Cut up your bell peppers into slices, remove the seeds, and roast them. I did it on our George Foreman, but you can also do it under the broiler in your oven (or toaster oven, if you have one). It's done when they're soft and kinda smushy. The skin should get kind of wrinkly.
With the garlic, you have two options. For a mellower flavor, roast them briefly, and for a bit of a spicy flavor, keep them raw. Or you could roast one, and throw the other in raw.
Toss the roasted bell peppers and roasted or raw (or both!) garlic into a food processor, and process. It's never going to be smooth just because of the texture of the peppers, but it's up to you if you want chunks or not, based on what you like from your dips. Once it's pretty well blended, start adding in the olive oil, bit by bit, to help it reach the consistency that you want. Be sure to taste while you're adding, though, because if you add too much it can dilute the red pepper taste.
Then add the balsamic vinegar. Again, taste as you go, because you might want more or less depending on how much you like balsamic vinegar. I love it, so I tend to go on the heavy side.
Pour out, and serve with veggies or pita chips! Or, really, anything, because this stuff is awesome.
Survey Says
I'm probably kind of biased, but I think this stuff is amazing. My husband seems to like it too, since he's been eating it and putting it on sandwiches ever since. And my coworkers tend to like it as well, so I'm going to say it's a keeper.
So one of my coworkers has this awesome Oscar party every year and asked people to bring a snacky-type food to share. Last year, when I wasn't trying to cook regularly, I brought 3 different dishes. This year, when I'm about 41 recipes behind where I should be, I only brought one.
Go figure.
It was a goodie, though!
Roasted Red Pepper Dip
makes around 1-2 cups?
3 red bell peppers
2 cloves garlic
1-2 tbsp olive oil
1-2 tbsp balsamic vinegar
Cut up your bell peppers into slices, remove the seeds, and roast them. I did it on our George Foreman, but you can also do it under the broiler in your oven (or toaster oven, if you have one). It's done when they're soft and kinda smushy. The skin should get kind of wrinkly.
With the garlic, you have two options. For a mellower flavor, roast them briefly, and for a bit of a spicy flavor, keep them raw. Or you could roast one, and throw the other in raw.
Toss the roasted bell peppers and roasted or raw (or both!) garlic into a food processor, and process. It's never going to be smooth just because of the texture of the peppers, but it's up to you if you want chunks or not, based on what you like from your dips. Once it's pretty well blended, start adding in the olive oil, bit by bit, to help it reach the consistency that you want. Be sure to taste while you're adding, though, because if you add too much it can dilute the red pepper taste.
Then add the balsamic vinegar. Again, taste as you go, because you might want more or less depending on how much you like balsamic vinegar. I love it, so I tend to go on the heavy side.
Pour out, and serve with veggies or pita chips! Or, really, anything, because this stuff is awesome.
Survey Says
I'm probably kind of biased, but I think this stuff is amazing. My husband seems to like it too, since he's been eating it and putting it on sandwiches ever since. And my coworkers tend to like it as well, so I'm going to say it's a keeper.
Friday, February 13, 2009
Day 44 - That was disgusting(ly good)
Day 44: Recipe 10 (darn!)
In an effort to show my face more around my building in a way that my students will like, I have come up with a new program, which I have dubbed "Happy [blank]! Have a [blank]!" Previous programs held were "Happy Thursday! Have some candy!" and "Happy Wednesday! Have a cookie!" Today I did the newest one - "Happy Friday! Have a cupcake!"
The cupcakes came from a box, and the frosting was going to come from a package as well, but then I decided that I needed to update this thing, so I made it from scratch. It was disgusting(ly good). The amounts below really are correct, which is part of why my husband will not get to see this - it's totally out of his diet, and he'd hate me.
Cream Cheese Frosting
makes way too much
1 1/2 lbs cream cheese, room temperature
1 lb butter, room temperature
2 lbs confectioners sugar
1 tbsp vanilla
Cream the cream cheese and the butter together until they're mixed. Then add the confectioners sugar little by little until it's well incorporated. Then add the vanilla. Then beat it like crazy until it's nice and fluffy.
DONE!
Survey says
The students loved it. So did the coworkers. So did I. So I say it's a keeper. But did you really expect anything different with an ingredients list like that? I'd encourage you to half it, though, because it was way too much. I had 96 mini cupcakes, and there's over half of it left.
In the mean time, anyone have a suggestion of what to do with 2 lbs of cream cheese frosting?
Wednesday, January 28, 2009
Day 28 - In a rut
So I've been struggling a bit lately because my husband has gone on a diet, and the things that I know how to cook and are excited about cooking don't tend to be friendly to his diet. I do have two things that I've cooked and just not posted about, but aside from that we haven't really done much cooking - mostly eating frozen or salads.
I know that I CAN cook food that fits his diet, I'm just not all that excited about it, because I love carbs and cheese and all sorts of other things that he's not eating at the moment. I'm going to do some searching for recipes online, and I'm still going to try to do 365 recipes this year, but I just need to get excited about cooking again.
I know that I CAN cook food that fits his diet, I'm just not all that excited about it, because I love carbs and cheese and all sorts of other things that he's not eating at the moment. I'm going to do some searching for recipes online, and I'm still going to try to do 365 recipes this year, but I just need to get excited about cooking again.
Monday, January 12, 2009
Dining out - Ethiopian food!
I didn't make it, but I ate it, so I'm posting it anyways
We had time for dinner every night with our staffs during training. During the school year we have to be back by 8:00 because an RA needs to go on duty, but the first night back there weren't any students, so we didn't have then 8:00 curfew. So we decided to go to little Ethiopia, and have Ethiopian food!
We went to Merkato at the suggestion of one of my Resident Ministers, who is very familiar with East African food since he lived there for a while. We basically put the ordering in his hands, and were delivered two large platters with all sorts of food.

The food is served on a pancake-type bread thingie, which has an odd texture because there are a bunch of bubbles in it. There was lamb, chicken, and beef, all with yummy sauces. There were also some vegetarian sides - cabbage, collared greens, peas, and a pico de gallo-type dish.
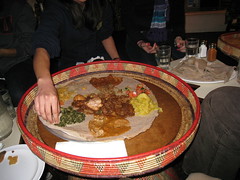
You eat it by ripping off some of the pancake-type stuff, and then picking up the food with it. It was communal, so the 9 of us ate off of two platters.

We ate it all. Then we ate some of the pancake from the bottom, because it had soaked in all the saucey goodness.

After dinner we had some coffee, which was ridiculously strong. My RM told us that coffee there is a very social thing, and the drinking can go on all night with the same beans, the coffee getting weaker as the night progresses.
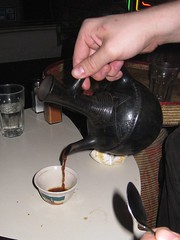
They were the teeny-sized cups, but we're not all coffee drinkers, so a few of us shared cups. One of our RAs had about 4 cups.
We only had one pot, and it did not get weaker with every drink.
It was very strong coffee.
He was up all night.
We had time for dinner every night with our staffs during training. During the school year we have to be back by 8:00 because an RA needs to go on duty, but the first night back there weren't any students, so we didn't have then 8:00 curfew. So we decided to go to little Ethiopia, and have Ethiopian food!
We went to Merkato at the suggestion of one of my Resident Ministers, who is very familiar with East African food since he lived there for a while. We basically put the ordering in his hands, and were delivered two large platters with all sorts of food.
The food is served on a pancake-type bread thingie, which has an odd texture because there are a bunch of bubbles in it. There was lamb, chicken, and beef, all with yummy sauces. There were also some vegetarian sides - cabbage, collared greens, peas, and a pico de gallo-type dish.
You eat it by ripping off some of the pancake-type stuff, and then picking up the food with it. It was communal, so the 9 of us ate off of two platters.
We ate it all. Then we ate some of the pancake from the bottom, because it had soaked in all the saucey goodness.
After dinner we had some coffee, which was ridiculously strong. My RM told us that coffee there is a very social thing, and the drinking can go on all night with the same beans, the coffee getting weaker as the night progresses.
They were the teeny-sized cups, but we're not all coffee drinkers, so a few of us shared cups. One of our RAs had about 4 cups.
We only had one pot, and it did not get weaker with every drink.
It was very strong coffee.
He was up all night.
Sunday, January 11, 2009
Banana Bread!
Day 11: Recipe 9
Late last night I entered the kitchen to get a glass of water, and realized that the bananas we had were getting pretty brown. My husband said to just throw them away, and I briefly considered that, but then I remembered that I had my mom's banana bread recipe! And who wants to waste food when you can make delicious bread instead? Delicious bread it is.
Mom's banana bread
makes 1 loaf
1 cup sugar
1/4 cup vegetable oil
1 egg
3 mashed, RIPE bananas
2 cups flour
1 teaspoon baking soda
2 steaspoons baking powder
1/4 cup walnuts or pecan pieces (optional - we opted out)
Preheat your oven to 325, and grease a bread pan.
Mix the sugar and vegetable oil together.
Beat the egg, and add it to the mixture. Mix some more.
Sift together flour, baking powder, and baking soda, then SLOWLY add it to the banana etc mix.
If you're going to throw in the nuts, do it now and mix (gently, so the nuts don't get pulverized.
Pour it into your bread pan, and bake it for an hour.

Survey says...
I loved it! So did my husband, my coworkers, my RAs, the RAs of the building across the way, and my temporary boss (because my regular boss was out of town). I was a little worried at first because the mix only went halfway up the pan, but it rose like crazy as it baked, and even got that neat little thing where it looks like it broke at the top.I really need to finally upload photos so that you know what I'm talking about. (Done! I uploaded pictures for previous recipes, as well.)
Totally making this again, though probably not for a bit since my husband's on a diet for the new year. Or maybe I'll just make it and eat it all by myself.
Late last night I entered the kitchen to get a glass of water, and realized that the bananas we had were getting pretty brown. My husband said to just throw them away, and I briefly considered that, but then I remembered that I had my mom's banana bread recipe! And who wants to waste food when you can make delicious bread instead? Delicious bread it is.
Mom's banana bread
makes 1 loaf
1 cup sugar
1/4 cup vegetable oil
1 egg
3 mashed, RIPE bananas
2 cups flour
1 teaspoon baking soda
2 steaspoons baking powder
1/4 cup walnuts or pecan pieces (optional - we opted out)
Preheat your oven to 325, and grease a bread pan.
Mix the sugar and vegetable oil together.
Beat the egg, and add it to the mixture. Mix some more.
Sift together flour, baking powder, and baking soda, then SLOWLY add it to the banana etc mix.
If you're going to throw in the nuts, do it now and mix (gently, so the nuts don't get pulverized.
Pour it into your bread pan, and bake it for an hour.
Survey says...
I loved it! So did my husband, my coworkers, my RAs, the RAs of the building across the way, and my temporary boss (because my regular boss was out of town). I was a little worried at first because the mix only went halfway up the pan, but it rose like crazy as it baked, and even got that neat little thing where it looks like it broke at the top.
Totally making this again, though probably not for a bit since my husband's on a diet for the new year. Or maybe I'll just make it and eat it all by myself.
Friday, January 9, 2009
Baked Oatmeal - not bad!
Day 9: Recipe 8
I did breakfast again, and again, it worked! I preferred the breakfast casserole, but I really did like the baked oatmeal, too.
Baked Oatmeal (from A Year of Crockpotting)
serves 8+
6 cups rolled oates (not instant, not steel-cut)
1 cup brown sugar
4 tsp cinnamon
4 tsp baking powder
2 tsp salt
2 cups milk
4 eggs
4 tsp vanilla
1/2 cup butter, melted
Dump all the dry stuff in the crockpot and mix well. Then beat the eggs and dump in the wet stuff, mixing well again.
Cook on low for about 5 hours. I really wanted to do this overnight, but since I don't have a smart crock pot (one of the kinds that switches to warm after a set time) and I sleep more than 5 hours a night, I bought a light timer (the kind that you use to have your lights turn on and off when you're out of town) and had it shut off after 5 hours. I only did this because the finished product would be shelf-stable, and it worked perfectly!
Let it sit in the cooling crockpot for at least an hour before you try to cut it. The more it sits, the more solid it becomes.
Survey says...
I served it with yogurt and fresh fruit and my RAs and I all liked it! It tasted kind of like a cinnamon oatmeal cookie. My husband didn't get to try it (and sounds a bit bitter about that) but I'm pretty sure he would have liked it. If I'd been just making it for us I'd have added dried fruit or something that I knew that we liked (maybe chocolate chips?) but since I was making for 8 people, I figured I'd stay generic and let people just add what they wanted.
Overall? I'll definitely make this again. Oh, and it made our apartment smell amazing for a full day.
Thursday, January 8, 2009
Breakfast Casserole - Success!
Day 8: Recipe 7
I cooked breakfast for my staff for the first time EVER! I'm totally in love with my crock pot.
Breakfast Casserole (mostly from A Year of Crockpotting)
serves a bunch - 10+
30 oz package of plain frozen hash browns
4 breakfast sausages, cooked (we used veggie)
1/2 onion, diced
1 bell pepper, dice
2 cups shredded cheese
12 eggs
1 cup milk
1 tsp black pepper
1 tsp salt
Dump the hash browns in the crockpot. Make sure it's all broken up and spread out evenly.
Cut up the sausages. In a seperate bowl, mix the eggs with the milk, salt, pepper, cheese, sausage, and veggies. Dump it on top of the hash browns.
Cover it, and cook on low for about 8 hours. It's done when the edges start to pull away a bit.
Survey says...
The husband and my RAs really liked it! I enjoyed it, but wish I had some salsa to eat it with, because I love salsa on my eggs.
I want to try it again with bacon. If my husband liked tomatoes and mushrooms I'd want to add them too. It's kind of a really thick omelette with potatoes.
Basically, it was good, but I think it'd be awesome with salsa.
Wednesday, January 7, 2009
An end to the laziness!
Turns out I'm not going to be lazy all week! I realized I have to feed my staff, so I'm going to feed them breakfast in overnight crock pot recipes. I really kind of wish that I had a smart crock pot though, because then you can set the time and they'll switch from 'cooking' to 'warm' when the cook time is up. As a hack I think I'm going to have to buy a timer like what you do for lights, so that the crock pot turns off at a certain time and the baked oatmeal doesn't overcook. I can't do that with real food, but since the baked oatmeal doesn't need to be refrigerated after cooking, it should work for this.
So I'm off to make the breakfast casserole, but I'll post the full thing and the recipe tomorrow, so that I can also write the review of it at that time.
So I'm off to make the breakfast casserole, but I'll post the full thing and the recipe tomorrow, so that I can also write the review of it at that time.
Tuesday, January 6, 2009
Laziness, part 2
I totally didn't cook today. We reheated a friend's frozen lasagna for dinner. It was really good, but I can't claim any credit.
I probably won't cook again until maybe Saturday, when I do something in the crock pot. Such is life during RA training.
I probably won't cook again until maybe Saturday, when I do something in the crock pot. Such is life during RA training.
Monday, January 5, 2009
"Indian" Crockpot Chicken
Day 5: Recipe 6
First day back at work, and I'm still cooking! Go me!
I was actually pretty worried about this dish because I stuck everything in the crock pot in the afternoon and then turned it on, but when I came back a couple of hours later the crock pot was cold! Turns out the reset button thingie on the power outlet had to be reset, so it hadn't turned on. Really upset I called my mom to see if it'd be okay to cook it (yes really, I called my mom) and she said that if the chicken was still cold it should be fine. The chicken was mostly frozen, so I went ahead and did it anyways.
You may have noticed that this is only labeled with flop. That's because I didn't really like it and thought it was, well, a flop.
"Indian" Crockpot Chicken (mostly from A Year of Crockpotting)
serves 2
two frozen chicken breasts
1 can diced tomatoes, drained
1/2 diced onion
1/2 tsp fresh minced ginger
2 cloves of garlic, minced
1/2 tsp ground coriander
1/4 tsp cayenne pepper
1 t garam masala
1/2 cup plain yogurt
Stick the chicken in the crockpot, and add almost all the spices - save 1/2 tsp of the garam masala. Then add the tomatoes and everything else.
Cook on high for 3 hours. I mixed it up once about halfway through.
30 minutes before you're done, stir in the yogurt and taste. If you feel like you need to, go ahead and add the rest of the garam masala (we did).
At this point our sauce was really liquidy, so we left it on high for the last half hour, but took the top off, to help some of the condensation evaporate. If yours is looking less liquid, cover it, and put it on low.
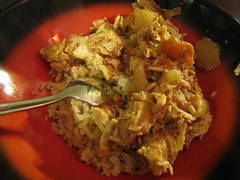
Survey says...
Meh. There was a lot of spice, but at the same time it was really bland - I'm not sure how that worked. Looking at the original recipe it seems like another woman who used chicken breasts instead of thighs had the same result, so I'm not sure if it was based on the kind of chicken I used, or what. We both tried it, but ended up eating the leftover enchiladas.
Overall? I don't think I'd try this one again. I'm still going to try to find a good Indian recipe or two, though!
First day back at work, and I'm still cooking! Go me!
I was actually pretty worried about this dish because I stuck everything in the crock pot in the afternoon and then turned it on, but when I came back a couple of hours later the crock pot was cold! Turns out the reset button thingie on the power outlet had to be reset, so it hadn't turned on. Really upset I called my mom to see if it'd be okay to cook it (yes really, I called my mom) and she said that if the chicken was still cold it should be fine. The chicken was mostly frozen, so I went ahead and did it anyways.
You may have noticed that this is only labeled with flop. That's because I didn't really like it and thought it was, well, a flop.
"Indian" Crockpot Chicken (mostly from A Year of Crockpotting)
serves 2
two frozen chicken breasts
1 can diced tomatoes, drained
1/2 diced onion
1/2 tsp fresh minced ginger
2 cloves of garlic, minced
1/2 tsp ground coriander
1/4 tsp cayenne pepper
1 t garam masala
1/2 cup plain yogurt
Stick the chicken in the crockpot, and add almost all the spices - save 1/2 tsp of the garam masala. Then add the tomatoes and everything else.
Cook on high for 3 hours. I mixed it up once about halfway through.
30 minutes before you're done, stir in the yogurt and taste. If you feel like you need to, go ahead and add the rest of the garam masala (we did).
At this point our sauce was really liquidy, so we left it on high for the last half hour, but took the top off, to help some of the condensation evaporate. If yours is looking less liquid, cover it, and put it on low.
Survey says...
Meh. There was a lot of spice, but at the same time it was really bland - I'm not sure how that worked. Looking at the original recipe it seems like another woman who used chicken breasts instead of thighs had the same result, so I'm not sure if it was based on the kind of chicken I used, or what. We both tried it, but ended up eating the leftover enchiladas.
Overall? I don't think I'd try this one again. I'm still going to try to find a good Indian recipe or two, though!
Sunday, January 4, 2009
Laziness = No recipe, but caramely goodness
Nothing in the way of 'real' recipes today. I did, however, put a can of sweetened condensed milk in my crockpot at high overnight, and this morning had an amazing can of caramely goodness. I did it after spending at least an hour (probably more) online trying to figure out how to do it without making it explode, because apparently it can do that. It happened to my mom's cousin once! And I'm really lazy and didn't want to clean up exploded caramel from all over my tiny apartment, much less get my face all burned and end up in the hospital. But it appears that I lucked out, so yay!
In case you're interested in doing it yourself (which you shouldn't because it can explode!), here's what I learned:
Take the label off.
There are two different kinds of cans that these things come in - the pop-top, and the can-opener-needed. The can-opener-needed is the one to use because the pop-top will, well, pop when the temperature gets too high, causing an explosion.
The can needs to be submerged the whole time. I'd tested my crockpot before and knew that water doesn't really evaporate with it, so I didn't have to worry about the water level getting too low, but if your water does evaporate, make sure you're topping it off with hot water. When you're keeping it in the water, the temperature doesn't get above 212 degrees, which is what the water's at. If the water level gets too low, then the can gets too hot, and that's what can cause an explosion.
Make sure the can has fully cooled before taking it out of the water and opening it. If the inside is still hot, then the temperature change (of taking it out of the water) or the pressure change (of opening it) can cause an explosion.
There are people who said that they'd been doing it for years, and they did everything right, but it still happened. So I'm not saying you should do it yourself, because it's dangerous and all that.
Other ways of doing it that were suggested as safe alternatives were (a) putting them in canning jars and doing them that way (that's what canning jars are for, after all), (b) pouring it into a pie plate which is also in a pan half-full of water in a 425 degree oven 60 minutes (stirring occasionally) and (c) double boiler, on the stove, stirring occasionally, for 60 minutes.
However you do it (though you should do it one of the safe ways) it's some caramely goodness.
Saturday, January 3, 2009
Apple Crumble, and a bonus recipe
Day 3: Recipe 5 (and a bonus)
My husband and I kinda wanted to go out for dinner tonight, but I didn't want to lose my momentum, so I decided I wanted to make a dessert for my recipe today. I was looking through the bookmarked recipes I had and came across an apple crumble one, but then decided that I've made a number of apple pies before, so I wanted to try this one on my own! The recipe is inspired by random ones I found online, and thrown together by me.
Apple Crumble
serves 6-8ish, with leftovers
For the apple filling:
3 medium-sized apples (I used Granny Smith)
1 tsp cinnamon
1/4 tsp allspice
1/2 cup sugar
1 tbsp lemon juice
2 tbsp butter, melted
Core the apples, then chop them up into thin slices, and then smaller pieces from that. I left the skin on because (a) my dad has always said it's a good source of fiber and (b) I'm lazy. If you think the texture change will bug you, then peel them also.
Throw them in a container and then toss in the cinnamon, allspice, sugar, lemon juice, and melted butter. Mix it thoroughly so that all the goodness gets on all the apple pieces. What I did is throw it in a Tupperware container and then just shake it up.
(optional) Stick it in the fridge for about an hour. I got this tip from my brother-in-law's girlfriend, and she said it helps the flavors sink in. It also gets you a little bit of juice right away. While it's in the fridge, work on the crumble.
For the crumble:
2 cup oats
1 cup crumbled graham crackers
1/2 cup yellow cake mix
4 tbsp butter, cold
Stick the oats, crumbs, and cake mix in a food processor and mix until the oats are completely ground and it's all thoroughly integrated.
Cut the butter into small cubes, and add them to the food processor a little at a time. Keep going until you can't really see the butter anymore, and the crumble has gotten, well, crumbly.
Take a medium-sized pan and pour in all the apple goodness, then top it with the crumbly goodness. Since the crumble was pretty loose at this point, I just kind of pushed it down with my hands to make sure that it was packed in tight.
Stick it in a 350 degree preheated oven for 30 minutes.
Let it cool, and eat. We especially liked it with ice cream.
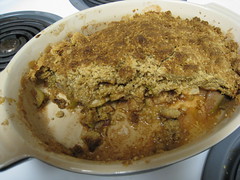
Bonus Recipe - Really Easy but Super Trashy Dump Apple Crumble
So the reason I had yellow cake mix sitting around was because about a month ago we'd had a holiday dinner at work, and I'd brought an apple crumble to that. However, the recipe that I'd made wasn't nearly as fancy as this one - it's basically a dump cake, and has exactly three ingredients:
1 can of apple pie filling
1 box of yellow cake mix
1 stick of butter
Dump the apple pie filling in a pie tin or medium pan.
Pour some of the yellow cake mix on top.
Dot the top of the yellow cake mix with butter, covering as much as possible.
Cook in a 350 degree oven for 20-30 minutes.
This is so good, but I hesitate to call it an actual recipe, so I'm not going to count it towards my 365. If I get behind nearing day 300, though, I'm probably going to go back and edit all my posts and pretend like I always counted this, so be warned.
Survey says...
I feel like the crumble was a little too crumbly, but I'm not sure how to transfer that from 'crumble' to 'crunchy crumble' so that's something I'm going to work on. The cake mix added a bit more vanilla and butter flavor to the crumble that I really liked, so I'm going to give myself props for thinking of it.
Overall? It was really tasty and it went especially well with ice cream. I'm also really proud of myself for coming up with a recipe that's more complex than 'marinate chicken breasts in salad dressing and then throw it on the grill!'
Also, I gave some of it to a friend of mine, and got the following text back as a reply: "Mmmm apple crisp... so good... make me talk like caveman."
My husband and I kinda wanted to go out for dinner tonight, but I didn't want to lose my momentum, so I decided I wanted to make a dessert for my recipe today. I was looking through the bookmarked recipes I had and came across an apple crumble one, but then decided that I've made a number of apple pies before, so I wanted to try this one on my own! The recipe is inspired by random ones I found online, and thrown together by me.
Apple Crumble
serves 6-8ish, with leftovers
For the apple filling:
3 medium-sized apples (I used Granny Smith)
1 tsp cinnamon
1/4 tsp allspice
1/2 cup sugar
1 tbsp lemon juice
2 tbsp butter, melted
Core the apples, then chop them up into thin slices, and then smaller pieces from that. I left the skin on because (a) my dad has always said it's a good source of fiber and (b) I'm lazy. If you think the texture change will bug you, then peel them also.
Throw them in a container and then toss in the cinnamon, allspice, sugar, lemon juice, and melted butter. Mix it thoroughly so that all the goodness gets on all the apple pieces. What I did is throw it in a Tupperware container and then just shake it up.
(optional) Stick it in the fridge for about an hour. I got this tip from my brother-in-law's girlfriend, and she said it helps the flavors sink in. It also gets you a little bit of juice right away. While it's in the fridge, work on the crumble.
For the crumble:
2 cup oats
1 cup crumbled graham crackers
1/2 cup yellow cake mix
4 tbsp butter, cold
Stick the oats, crumbs, and cake mix in a food processor and mix until the oats are completely ground and it's all thoroughly integrated.
Cut the butter into small cubes, and add them to the food processor a little at a time. Keep going until you can't really see the butter anymore, and the crumble has gotten, well, crumbly.
Take a medium-sized pan and pour in all the apple goodness, then top it with the crumbly goodness. Since the crumble was pretty loose at this point, I just kind of pushed it down with my hands to make sure that it was packed in tight.
Stick it in a 350 degree preheated oven for 30 minutes.
Let it cool, and eat. We especially liked it with ice cream.
Bonus Recipe - Really Easy but Super Trashy Dump Apple Crumble
So the reason I had yellow cake mix sitting around was because about a month ago we'd had a holiday dinner at work, and I'd brought an apple crumble to that. However, the recipe that I'd made wasn't nearly as fancy as this one - it's basically a dump cake, and has exactly three ingredients:
1 can of apple pie filling
1 box of yellow cake mix
1 stick of butter
Dump the apple pie filling in a pie tin or medium pan.
Pour some of the yellow cake mix on top.
Dot the top of the yellow cake mix with butter, covering as much as possible.
Cook in a 350 degree oven for 20-30 minutes.
This is so good, but I hesitate to call it an actual recipe, so I'm not going to count it towards my 365. If I get behind nearing day 300, though, I'm probably going to go back and edit all my posts and pretend like I always counted this, so be warned.
Survey says...
I feel like the crumble was a little too crumbly, but I'm not sure how to transfer that from 'crumble' to 'crunchy crumble' so that's something I'm going to work on. The cake mix added a bit more vanilla and butter flavor to the crumble that I really liked, so I'm going to give myself props for thinking of it.
Overall? It was really tasty and it went especially well with ice cream. I'm also really proud of myself for coming up with a recipe that's more complex than 'marinate chicken breasts in salad dressing and then throw it on the grill!'
Also, I gave some of it to a friend of mine, and got the following text back as a reply: "Mmmm apple crisp... so good... make me talk like caveman."
Friday, January 2, 2009
Sour Cream Chicken Enchiladas and Bacon Wrapped Stuffed Jalapenos
Day 2: Recipes 3 & 4
You know, it's a good thing I'm getting ahead, because next week I'm in charge of January Training for 100 RAs, so I'm going to be pretty busy, and probably eating lots of pizza.
Living on a college campus at 27 is pretty weird sometimes, but one of the cool parts is that if you're friends with your coworkers, you have friends that live really nearby! Tonight my husband and I went over to a friend's apartment, where said friend and I cooked and our significant others watched TV and talked video games until dinner was ready.
Each of us had brought a recipe, but we helped each other with our recipes, so I'm going to count both. The enchilada recipe is my mother in law's, and I'd made it once about 5 years ago when my husband and I were in the early days of our relationship, but we'd since lost the recipe and didn't get it back until we were visiting his family over Christmas. It uses cream of chicken soup, and I know that some people are morally opposed to that, so fair warning. The jalapenos were completely new, and the first time I'd really worked with them, aside from just chopping some up for chili. We also had a side of mexican rice, but that came from a package.
Sour Cream Chicken Enchilada (from my mother in law)
serves 4-6
6-9 corn tortillas
1 large cream of chicken soup
large container of sour cream
1 bunch of green onions
16 ounces shredded cheddar cheese
4 chicken breasts
In a large bowl, combine the cream of chicken soup and sour cream. Mix it up well. Cook the chicken breasts and shred them up, and chop up the green onions. Shred the cheese, if you haven't already. Then line up the soup mixture, green onions, cheese, and chicken in separate bowls.
Put light layer of the sour cream mixture on the bottom of a rectangular glass plan.
This next part didn't work for me, but I'm going to include it because I think it would have softened the tortillas some. Heat up a pan of oil, about one inch deep, and saute a tortilla to soften it up. Do it quickly enough that it doesn't get crisp.
Move the tortilla to a paper towel. Then put some sour cream mix, chicken, cheese, and green onions in the tortilla. Roll the tortilla up, and put it, seam side down, in the glass pan, on top of the sour cream mixture.
Keep doing this until all are done and the pan is full. We only managed to fit 7, so there was some chicken left at this point - I just stuck it along the sides of the pan, since there was room at the top and bottom of the enchiladas.
Take the remaining sauce and pour it all over the enchiladas, then throw the rest of cheese on there, and sprinkle the green onions, too.
Stick it in the oven at 350, and cook it until it's bubbly and the cheese is melted - probably around 20-30 minutes.
Stuffed Jalapenos Wrapped in Bacon (from The "Taste of Home" Cookbook)
makes 15 jalapenos, so how many it serves really depends on how well you like them
15 large jalapenos
2 cups shredded Monterrey Jack cheese
4 ounces of cream cheese, softened
1/2 cup minced cilantro
1/4 tsp garlic powder
1/4 tsp paprika
15 strips of bacon
Cut the stems off the jalapenos, and remove the seeds and the membranes. If you haven't worked with jalapenos before, know that you should probably get some gloves to do this with, because those buggers are hot! Make sure not to touch your eyes (or your mouth, or really anything but the jalapenos) when you've got the juices on you, because it'll burn. And when you're removing the seeds, make sure you get the ones way down at the bottom of the pepper.
Mix up the cheese, cilantro, garlic and paprika, until it's blended well and pretty smooth.
Stuff the cheese mixture into the jalapenos, and then wrap the bacon around them.
Grill them until the bacon is crisp and the filling is heated - around 4-5 minutes. Make sure you're rolling around so that the bacon gets cooked on all sides.
Eat!
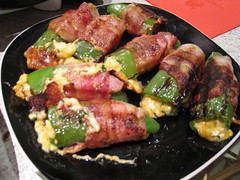
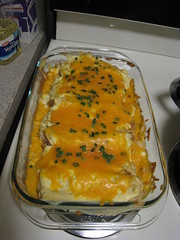
Survey says...
The enchiladas totally fell apart because I failed at the whole "cooking the tortillas in oil" thing. They were really good though, and we started talking about ways to modify it, like maybe making a casserole or layered-type dish. My husband wants to try mixing chips in, because he wants to mix chips in everything. (But this time, he might have a point - I think the texture difference would be good.)
The jalapenos were crazy spicy! We think that we might not have done the seeds and membrane right, because they really were hot. However the inside was really great, and who doesn't love bacon? I'd totally try this again and do a little more research on how the prepare the actual peppers.
Overall? Definitely trying both again, and I want to figure out how to make my own cream of chicken soup and use that in the enchiladas!
You know, it's a good thing I'm getting ahead, because next week I'm in charge of January Training for 100 RAs, so I'm going to be pretty busy, and probably eating lots of pizza.
Living on a college campus at 27 is pretty weird sometimes, but one of the cool parts is that if you're friends with your coworkers, you have friends that live really nearby! Tonight my husband and I went over to a friend's apartment, where said friend and I cooked and our significant others watched TV and talked video games until dinner was ready.
Each of us had brought a recipe, but we helped each other with our recipes, so I'm going to count both. The enchilada recipe is my mother in law's, and I'd made it once about 5 years ago when my husband and I were in the early days of our relationship, but we'd since lost the recipe and didn't get it back until we were visiting his family over Christmas. It uses cream of chicken soup, and I know that some people are morally opposed to that, so fair warning. The jalapenos were completely new, and the first time I'd really worked with them, aside from just chopping some up for chili. We also had a side of mexican rice, but that came from a package.
Sour Cream Chicken Enchilada (from my mother in law)
serves 4-6
6-9 corn tortillas
1 large cream of chicken soup
large container of sour cream
1 bunch of green onions
16 ounces shredded cheddar cheese
4 chicken breasts
In a large bowl, combine the cream of chicken soup and sour cream. Mix it up well. Cook the chicken breasts and shred them up, and chop up the green onions. Shred the cheese, if you haven't already. Then line up the soup mixture, green onions, cheese, and chicken in separate bowls.
Put light layer of the sour cream mixture on the bottom of a rectangular glass plan.
This next part didn't work for me, but I'm going to include it because I think it would have softened the tortillas some. Heat up a pan of oil, about one inch deep, and saute a tortilla to soften it up. Do it quickly enough that it doesn't get crisp.
Move the tortilla to a paper towel. Then put some sour cream mix, chicken, cheese, and green onions in the tortilla. Roll the tortilla up, and put it, seam side down, in the glass pan, on top of the sour cream mixture.
Keep doing this until all are done and the pan is full. We only managed to fit 7, so there was some chicken left at this point - I just stuck it along the sides of the pan, since there was room at the top and bottom of the enchiladas.
Take the remaining sauce and pour it all over the enchiladas, then throw the rest of cheese on there, and sprinkle the green onions, too.
Stick it in the oven at 350, and cook it until it's bubbly and the cheese is melted - probably around 20-30 minutes.
Stuffed Jalapenos Wrapped in Bacon (from The "Taste of Home" Cookbook)
makes 15 jalapenos, so how many it serves really depends on how well you like them
15 large jalapenos
2 cups shredded Monterrey Jack cheese
4 ounces of cream cheese, softened
1/2 cup minced cilantro
1/4 tsp garlic powder
1/4 tsp paprika
15 strips of bacon
Cut the stems off the jalapenos, and remove the seeds and the membranes. If you haven't worked with jalapenos before, know that you should probably get some gloves to do this with, because those buggers are hot! Make sure not to touch your eyes (or your mouth, or really anything but the jalapenos) when you've got the juices on you, because it'll burn. And when you're removing the seeds, make sure you get the ones way down at the bottom of the pepper.
Mix up the cheese, cilantro, garlic and paprika, until it's blended well and pretty smooth.
Stuff the cheese mixture into the jalapenos, and then wrap the bacon around them.
Grill them until the bacon is crisp and the filling is heated - around 4-5 minutes. Make sure you're rolling around so that the bacon gets cooked on all sides.
Eat!
Survey says...
The enchiladas totally fell apart because I failed at the whole "cooking the tortillas in oil" thing. They were really good though, and we started talking about ways to modify it, like maybe making a casserole or layered-type dish. My husband wants to try mixing chips in, because he wants to mix chips in everything. (But this time, he might have a point - I think the texture difference would be good.)
The jalapenos were crazy spicy! We think that we might not have done the seeds and membrane right, because they really were hot. However the inside was really great, and who doesn't love bacon? I'd totally try this again and do a little more research on how the prepare the actual peppers.
Overall? Definitely trying both again, and I want to figure out how to make my own cream of chicken soup and use that in the enchiladas!
Thursday, January 1, 2009
Pollo Rosa Maria knockoff and Alfredo sauce
Day 1: Recipes 1 & 2
I figured I might as well get ahead on the first day, so tonight we had a chicken dish and pasta alfredo. The chicken dish is meant to be similar to Carrabba's Pollo Rosa Maria, and the pasta is supposed to be an alfredo, but we made some modifications, so a purist might argue that they're not really.
I'd made the chicken a few years ago, but I've never tried to make my own alfredo sauce. Both of these are incredibly unhealthy, which means that they're kind of amazing.
Pollo Rosa Maria knockoff (modified from here)
serves 2
2 skinless, boneless, chicken breasts
2 slices prosciuto ham
1/4 cup fontina cheese
1/4 cup clarified butter - see Notes, below
2 small cloves garlic - minced
1/4 sm. yellow onion - chopped
1/8 cup dry white wine
3 sliced mushrooms
2 Tbls. butter
1/4 tsp. salt
1/4 tsp. pepper
1/4 cup chopped fresh sweet basil (we used 1/8 cup dry basil because the grocery store was out, but fresh'd be better)
1 Tbls lemon juice
Butterfly the chicken breasts and cook them in a pan over medium heat. If you have pan that's not non-stick that'd be better because you're going to deglaze the pan in a bit, but we didn't and it turned out fine anyways.
While that's cooking chop up the onion and mushrooms, and minced the garlic.
You need to let the chicken cool a bit and then stuff the inside of it with a slice of prosciutto and half the fontina cheese. If the all cheese doesn't fit, just stick the rest on top. Then find a way to keep it warm - I just wrapped it in foil and put it in a warm oven.
The chicken had left all sorts nice little brown bits on the pan, so take it off the heat and add the white wine to deglaze the pan. Then toss in the clarified butter, the garlic and the onion and saute it over medium heat, until the onions are clear.
Add the mushrooms, butter (the non-clarified bit), salt, and pepper, and then saute it a bit more, until the mushrooms are tender. Stir in the basil and lemon juice and stir a bit more. Maybe 2-3 minutes.
Pour the sauce over the stuffed chicken and you're done!
White Alfredo-ish sauce (modified from here)
serves 3-ish
1/4 cup butter
1 garlic clove, minced
1 cup heavy cream
1/8 tsp pepper
1/4 cup grated parmesan cheese
1/2 cup shredded fontina cheese
Melt the butter in a saucepan over medium-low heat. Then add the garlic, cream, and pepper, and bring it all to a simmer. Make sure you stir it often. I just put my husband in front of it, and told him to stir it constantly.
Once it's simmering, add the parmesan cheese and simmer again, stirring regularly, until the sauce has thickened a bit, and is smooth.
When that's done, add the fontina cheese bit by bit and stir constantly, until it's smooth.
Voila! White alfredo-ish sauce.
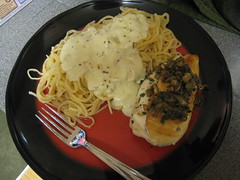
Survey says...
The chicken was a little dry, so I'll have to try this again and find a way to keep that from happening. It might have been from the time in the oven, or it might have been from the fact that I didn't cook it with anything. We'll work on that for next time.
The alfredo sauce was a little grainy, but I don't know if that's because of the alterations I made or something wrong with all the cooking. That just affected the texture, though - not the taste.
Overall? We'll definitely make the chicken again, though I'll probably follow the recipe exactly for the alfredo sauce next time, and see if that fixes the issue.
I figured I might as well get ahead on the first day, so tonight we had a chicken dish and pasta alfredo. The chicken dish is meant to be similar to Carrabba's Pollo Rosa Maria, and the pasta is supposed to be an alfredo, but we made some modifications, so a purist might argue that they're not really.
I'd made the chicken a few years ago, but I've never tried to make my own alfredo sauce. Both of these are incredibly unhealthy, which means that they're kind of amazing.
Pollo Rosa Maria knockoff (modified from here)
serves 2
2 skinless, boneless, chicken breasts
2 slices prosciuto ham
1/4 cup fontina cheese
1/4 cup clarified butter - see Notes, below
2 small cloves garlic - minced
1/4 sm. yellow onion - chopped
1/8 cup dry white wine
3 sliced mushrooms
2 Tbls. butter
1/4 tsp. salt
1/4 tsp. pepper
1/4 cup chopped fresh sweet basil (we used 1/8 cup dry basil because the grocery store was out, but fresh'd be better)
1 Tbls lemon juice
Butterfly the chicken breasts and cook them in a pan over medium heat. If you have pan that's not non-stick that'd be better because you're going to deglaze the pan in a bit, but we didn't and it turned out fine anyways.
While that's cooking chop up the onion and mushrooms, and minced the garlic.
You need to let the chicken cool a bit and then stuff the inside of it with a slice of prosciutto and half the fontina cheese. If the all cheese doesn't fit, just stick the rest on top. Then find a way to keep it warm - I just wrapped it in foil and put it in a warm oven.
The chicken had left all sorts nice little brown bits on the pan, so take it off the heat and add the white wine to deglaze the pan. Then toss in the clarified butter, the garlic and the onion and saute it over medium heat, until the onions are clear.
Add the mushrooms, butter (the non-clarified bit), salt, and pepper, and then saute it a bit more, until the mushrooms are tender. Stir in the basil and lemon juice and stir a bit more. Maybe 2-3 minutes.
Pour the sauce over the stuffed chicken and you're done!
White Alfredo-ish sauce (modified from here)
serves 3-ish
1/4 cup butter
1 garlic clove, minced
1 cup heavy cream
1/8 tsp pepper
1/4 cup grated parmesan cheese
1/2 cup shredded fontina cheese
Melt the butter in a saucepan over medium-low heat. Then add the garlic, cream, and pepper, and bring it all to a simmer. Make sure you stir it often. I just put my husband in front of it, and told him to stir it constantly.
Once it's simmering, add the parmesan cheese and simmer again, stirring regularly, until the sauce has thickened a bit, and is smooth.
When that's done, add the fontina cheese bit by bit and stir constantly, until it's smooth.
Voila! White alfredo-ish sauce.
Survey says...
The chicken was a little dry, so I'll have to try this again and find a way to keep that from happening. It might have been from the time in the oven, or it might have been from the fact that I didn't cook it with anything. We'll work on that for next time.
The alfredo sauce was a little grainy, but I don't know if that's because of the alterations I made or something wrong with all the cooking. That just affected the texture, though - not the taste.
Overall? We'll definitely make the chicken again, though I'll probably follow the recipe exactly for the alfredo sauce next time, and see if that fixes the issue.
First Post!
Towards the end of 2008, I started cooking regularly, and realized how much I really missed it! However, I'm really good at getting all excited about things, but then not following through. I came across A Year of Crockpotting in late December, where a woman made a crockpot recipe every day for a year and blogged about it in order to keep herself accountable to her resolution, so I decided to do something like that!
It should be noted that 365 recipes means 365 unique recipes, but does not mean a recipe a day. My job takes up a lot of time so I can't cook fresh every day, and my husband and I also like to eat out. Pair that along with the vacations I plan on taking in 2009, and that means there are going to be a bunch of days that I'm not going to cook. So 365 recipes means just that - 365 recipes in one year. If for dinner I try out a new marinade for steak and a new mashed potato recipe, that's two recipes, freeing me up to skip a day.
The recipes will likely not be complex (at first, at least) and will probably be from various magazines, websites, and friends and family members. Oh, and cookbooks. I have about a billion cookbooks. If you're a cooking snob you'll probably be bored or maybe even a bit offended by what I'm cooking because, yes, even Rachel Ray has a spot among my cookbooks.
Knowing myself and my habit to procrastinate, it's quite possible that this blog will lie dormant for a week or two, and then I'll realize it and make a 10 course meal. Or, it may lie dormant for a week or two, and then I realize and ignore it on purpose because I'm so embarrassed.
But this is the first post, and we'll see where it goes! Now I should probably figure out what I'm cooking for dinner, so that I start this out on the right foot...
Subscribe to:
Posts (Atom)
